Friday, August 24, 2012

Update Blog - Paper Silhouettes Revealed!

This week I wasn't able to complete a Craft Adventure Venture. Actually that's not completely accurate. I'll have it finished before I go to bed tonight, BUT I really didn't want another late night blog, so I'm calling it for this week.

I'll have super cute stuff to share next week, though. Baby Shower gifts are so much fun to make. Everything is so soft and cuddly. Sorry, I was distracted there for a minute by ultra cuddle fleece.

This week's blog is just an update from last week where I get to reveal the paper silhouettes that I made as birthday gifts. The recipients really liked them.

Just in case you missed it last week - Here is the link to the pieces that inspired these Craft Adventure Ventures: Handmade Silhouettes Etsy Store
(Lots of cute stuff in her store by the way. And I think I read that some of them are customizable.)

Craft Adventure Venture #7 - Part of Your World

Finished - No Frame. You can see the colors a little better

Finished - In Frame. You can see the depth best in this one.

So I had a couple issues with this one, but the picture was such a perfect layout that it really came together without much of a fight. I used cardstock for the silhouette pieces to give them a little more stability, but the background is scrapbook paper. I used glitter glue to highlight the water, her tail and as the stars in the sky.

Again, it's a really simple project that you need a bit of time to work on. You have to be patient and not rush through the cutting or you will cut something that was supposed to be left alone. Or you'll leave something and have to go back and correct it.

Just a note on negative space. What the heck is Negative Space? Paper silhouettes are all about negative space, so you really have to be discerning when selecting the picture you want to create. If it has too many details it's not going to translate well and no one will be sure what your subject is. But you also want it to have enough detail that it's interesting. Of course a completely sparse silhouette might be just your thing. It's Art after all, so who's to say.

The  How-Tos:

1) Find a picture that you like. Here, the moon was just perfect and it's pretty easy to figure out the figure and that she is sitting on a rock.
(Which I don't have the rights to use, but since it was a gift and I'm not selling these, I don't think they can say anything.)

2) Print out picture in the size you wish to work with - This is 8.5 x 11. But you can go up or down in size depending on what you want your finished piece to look like.
Print your picture in Black & White, (or Grayscale if your photo program doesn't give you that option), you'll use this as your template. The fewer fine details the better.

3) Cut out your pieces. For this one, I wanted to mimick the original piece as closely as possible with the dark background, light Moon and her in front. To do that I cut the Moon and reflection separately from the character. The paper I originally cut her out from wasn't really dark enough, so I went over the paper with a Copic Marker. It gave her a water colored feel that was a very happy accident.

Note - While I think this would still have been a nice piece in just black and white, no one says that silhouettes have to be duo-tone (two colors). You can have as many or as few colors as you like. Have fun with it.

4) Put the pieces together. The Moon is adhered with photo glue (non-acid glue stick) directly to the background. To give the character more depth I used foam dots to hold her in place.

Craft Adventure Venture #8 - The Pumpkin King

Finished - In Frame
Same how-to as above. For this one I used cardstock for the background, Moon and character. I used scrapbook paper for the hill and regular copy paper for the dog. I wanted the dog to seem a little translucent but I thought that vellum paper would be too much.

After I finished the piece I really thought it was too sparse and added more details that weren't there in the original picture I was working from. Even after retooling it a bit, I had some concerns. In the end the person who received it, loves it and that's all that matters.

These CAVs were for a couple, so I wanted to create a theme using the Moons. Even though the characters aren't related and the colors are different, seen side by side, it's clear they are supposed to be a set.

That's pretty much all there is. I'm looking forward to doing some more paper silhouettes in the future, I really enjoyed making them. Well, I need to pop back to the sewing machine and finish up those baby shower gifts. School starts next week, I'm nervous and excited and have no idea how I'm going to juggle everything. Where there's a will and lots of caffeine, there's a way.

My goal for next week is to not freak out, make some important phone calls and hopefully squeeze in an extra CAV to make up for this week. September is just around the corner, that means Halloween crafts and costumes. And the ban on knitting will be lifted and I have a charity project already in the wings. Till that time.. Stay Crafty!

This weeks totals: 0 Craft Adventure Ventures - total remains 8.
43.5 Craft Adventure Ventures to go!

Friday, August 17, 2012

How Doth the Little Busy Bee Improve Each Shining Hour..

I've been a very busy bee this week and yet, still didn't tick off all that I had hoped to accomplish. I suppose I should be upset that I still have a gigantic To Do List, but I'm trying to be practical and not stress out. Everything on the To Do List has a priority level and most of them fall into the 'Nice to have Completed' category. More importantly, every week I get better at managing my time.

Time management is a habit that you have to create. When you are younger it's much easier, your parents, teachers and coaches guide you where you need to be, when you need to be there. Almost every part of your day is planned out, so goofing off time is actually pretty hard to fit into your day. But when you become an adult, that's all up to you. Most people don't have a job that dictates where they should be at any given moment; you're assigned tasks and it's up to you to have the discipline to complete it in the time you've been given. When you work from home, (I include Stay Home Parents as Work from Homers), it's much easier to get lazy and be distracted and that's the trap I fell into over the last year or so. Now it's up to me to create more structure and believe it or not having The Craft Adventure Venture has really helped me to improve that. It's been an unexpected bonus from starting this project.

And now back to your regularly scheduled program..

This week I completed two Craft Adventure Ventures and they are both gifts. Which is a little sad, because I am excited to share them with you. You'll just have to wait, though. The Birthday Guy & Gal haven't received them in the mail yet, so until they get to see them, you'll have to be patient. It's worth the suspense. And that means an update blog! That's a little exciting, right?

I can tell you that they are both Paper Silhouettes. Here is the link to the pieces that inspired the Craft Adventure Ventures this week: Handmade Silhouettes Etsy Store
(She has some really cute stuff by the way.)

My creations actually don't look anything like these, they are more of a tribute. (Sorry, I couldn't resist) Anyway, these charming silhouettes combined with using my friend Becca's Cricut machine last week were the jumping off point for the weeks CAV. I don't have a Cricut machine, so these projects were all done by hand with an Exacto knife. (On a side note, if you have to use an Exacto knife or other craft knife for a project like this, try and find one of those squishy pencil rest thingies. I thought of that pretty late into my projects, but it really helps with the pressure and cramping.)

Here are the basics of the project - 1) Find a character silhouette, or a picture of someone special, or a pet or pretty much anything else that is iconic to you.

2) Print it out in black and white and use the B/W picture as a template to cut out your silhouette.

Note - Not everything is going to look good as a silhouette and layout is very important. Simple shapes work best. Similar to the cake topper project, look at whatever your subject is as it's simple shapes. And unless you are super good at using an Exacto knife, try and start with something with out a lot of detail or intricate patterns. It will look cleaner and there will be less chance of you cutting something important that should have been left in place.

3) Glue your pieces to a background.

The nice thing about this project is it can be as simple or detailed as you want to make it. You can layer up pieces to create depth or add small embellishments. It's a really fun project and I'm already thinking of other paper silhouettes I can make. They make great gifts and frame up nicely.

All wrapped and ready for the mail.

My time management goal for next week is to be up as well as dressed every day by 9am. School is a little over a week away, and I have a lot to get in order before I start. I need to set aside at least an hour working on math everyday, and I need to finish getting some things around the house organized for my Dad. Finally, I need to set aside at least an hour a day to get the rest of the baby items ready and sold on Ebay, which should hopefully help to clear up the clutter around here. Next weeks Craft Adventure Venture will be a baby shower gift, but I'm also trying to finish the crib sheet project for Ms. Bean.

Lots of exciting new things coming up, buzz buzz buzz.

Here's the count for this week: Two (2) Craft Adventure Ventures brings the total to 8!
42.5 Craft Adventure Ventures to go!


Saturday, August 11, 2012

How Did It Get So Late So Soon? Its Night Before Its Afternoon..

My apologies for posting this a day late. As my return to school becomes imminent my need for planning and good time management is rapidly moving from a nicety to a necessity. Adding to the challenges this week was the fact that I was just completely wiped out. I couldn't sit for more then five minutes without dosing off, so I felt it was in my best interest last night to go to bed early, (at least by my standards), and get some much needed rest. Hence my late posting of this blog.

On a side note - I am going to stop prefacing my blog with how busy my week has been. With all the things I have committed to, it really goes without saying. I just have to make a concerted effort to plan out my day and manage my time better.

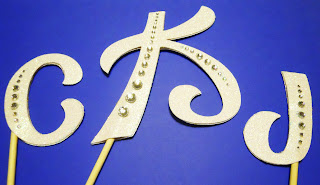
This week I only had time enough to work on one Craft Adventure Venture, and I had to call in back up to complete it. I've known for awhile that I would be working on a wedding craft/gift for my aunt who is getting married later this month. I just didn't know until last week what that craft/gift would be. Turned out to be cake toppers. My aunt has a very small wedding budget to work with, so some of the things she wanted for her wedding had to be let go. One item on her wish list, was a sparkly, 'blingy' set of monogram cake toppers. If you order them off the internet they cost around $40. Not a bad price, but definitely not in the cards with everything else she still needed to account for. So I offered to make them for her.

Here's my thinking on cake toppers. You only use them for a couple hours and then you put them away somewhere and never see them again (or sell them at a garage sale). Really you just need the cake topper to look pretty for a little while and take a nice photo. Initially, I wanted to find wooden letters, but since I was limited on time, where I could look and transportation, I had to come up with another plan.

My wonderful friend Rebecca has a Cricut machine. I'd briefly seen what it could do when I was working on my own budget wedding invitations. And I have to say that it pretty much rocks. I totally want one of my own. It's big downfalls are they are heavy, they take up a lot of space and they are expensive. (Cricuts come in a couple different sizes/types, so some of them may not be as heavy or big as the one Becca has. And she got hers on a Black Friday deal with a coupon, so you might be able to get around some of my issues.) Other than that, they are really cool. And make crafting so easy, especially this one.

The only description I was given from my aunt on her cake toppers was - 'Bling, I want Bling.' We opted for a thick glitter covered card stock (We had wanted chipboard, but couldn't find it), and picked up some princess cut rhinestone stickers for embellishment. It took us a while to play around with the font and size that we liked, but after about an hour we had the letters all cut out and ready to go.

We were using thick skewers for getting the letters to sit on the cake, so we needed a good way to hide them between the two pieces of card stock. We tried puffy glue dots, but that didn't really work, so I ended up just hot gluing everything together. (Which if we had been using any other type of paper would have ended really badly) Then I used glitter glue in the same color as the card stock to fill in the gaps that were left behind. It wasn't a perfect solution, but then I remembered my theater/stage craft class. When you are building a set or even acting on a stage, (in most cases), the closest person to you in the audience is 30 feet away. In this case, when you are talking about wedding decorations, no one is going to be sitting right up on the cake and when they photograph the cake it will most likely be from the front.

That just left the bling. I rounded up every sparkly rhinestone I had and made a few practice runs on where and how to fix the pieces. I started hot gluing the rhinestones on, but when I got to the smaller pieces all I really was doing was burning my hand, so I changed to glitter glue.

I think the overall result is blingy, sparkly and just right for a wedding.

Craft Adventure Venture #6

Wedding Cake Bling
If I had to change anything I think I would have chosen a different color for the glitter card stock. I knew my aunt was going to put flowers on the top of the cake, so I think it will look lovely when it's all set up, but it's a little hard to see how sparkly they really are. Since I didn't know her wedding colors I was limited, and I thought the silver they had would have over shadowed the rhinestones.

I sent her a text picture of them and she seemed really pleased and I can't wait to see how they looked on her cake. Every bride should feel special on their wedding day and if cake topper bling makes my aunt feel special, well then it was totally worth the burns on my fingers to make these for her.

This was a super simple project. If you don't have a Cricut you can use your printer to either make templates or print directly onto the paper you are using and then use an Exacto knife to cut them out. That will add a lot of time to the project, but it's still easy to do. The nice thing about this Craft Adventure Venture is you can apply it to other party related projects. Scale them down and make cupcake decorations, scale them up and make a yard sign or yard decorations. And you don't have to use just letters, if you are doing a cake for a party and it's a character theme, print, embellish and cut out the character and then use a skewer (one big enough to hold the weight) to create your cake topper.

Even if you are working on a budget you can find a way to get the look or decoration you desire without spending a lot of money or time. You just have to look at things from a different perspective. Kind of like when you are learning to draw and they tell you to look for the simple shapes in more complex objects. Mickey Mouse is three circles and a square, you know that kind of thing.

Coming up this week, organization, organization, and Ebay. I still have a couple of Ms. Bean projects to tackle. But most important I have two birthday presents to make and a baby shower gift to complete. I'm going to be a busy little Do-Bee.

Final Tally for the week - 1 Craft Adventure Venture brings the total to 6 and .5 Bonus Quests.
45.5 Craft Adventure Ventures to go!

Friday, August 3, 2012

I Have No Idea What Day It Is - Frankenscarf Update

I was so excited that I finished my blog on time yesterday. A little disappointed to not have the scarf finished for a second week, but glad that I had something to show for the week. And as I drifted off to sleep my brain said to me, "You know it's Thursday, right?" The answer to that was nope, sure as heck if I didn't. I apologize if my internal calendar lapse caused any confusion.

So now it's Friday and I've already posted my blog for the week. I did finish the Frankenscarf last night and wanted to give a quick update.

Wrapped around Ms. Bean


My Albatross - Frankenscarf
I didn't turn out as bad as I thought it was going to. I managed to get all the way to the end before I ran out of white yarn. I can see how badly the stripes don't match and it's glaringly obvious where I messed up the knit pattern, but it's a passable scarf. It's warm and fuzzy, so when winter comes around it will be very nice to have, even if it is homely.

So there he is and I think I'm going to pass on the knitting for a month. Maybe a break will get my mojo working again.

Finally Tally for the week -
1.5 Craft Adventure Ventures and .5 Bonus Adventures; 46.5 CAVs to go!


Thursday, August 2, 2012

Ah ! Well a-day ! What Evil Knits

I endeavor to keep this blog short, as I am very tired today. However, I am easily distracted and verbose so it may not happen.

The Scarf

That stupid scarf has become my Albatross. It's still not finished. I took it apart, re-knit the pattern and still managed to mess it up. Additionally I may run out of white yarn before I complete it. I flatly refuse to buy another skein of the white yarn, so I'll most likely Frankenstein something together. I have no idea what I will do with it after I am finished with it,(OH! I will finish that scarf!), since the pattern is a mess and it will have some random yarn at the bottom. I didn't even bother taking a picture of it this week, because I'm simply disgusted with the whole affair and couldn't bare to immortalize the lumping thing. Instead enjoy this photo.

Sad Albatross is Sad. And also he hates scarves.
It's really too bad because the yarn is really comfy and I made it extra long. Maybe I'll post it on Facebook and the 1st person to like it will get it. "Wonky Scarf Needs Good Home." I'll have to keep you posted on it's plight.

Craft Adventure Ventures

I did complete a couple of small projects. I was distracted by them while trying to finish finding something else and cleaning. Sometimes my ADD creates whimsical things and here they are.

Doodle Bobs
I need to make them chains or turn them into key chains, but for all intents and purposes they are completed projects. They each took less then 15 minutes, so combined they only equal 1/2 of a CAV.

Bonus Adventure #1

My friend Becca was wonderful and came & picked up Ms. Bean & I and took us to Micheal's. I needed to get some items for another Bonus Adventure I am in the process of making. (It's a gift for a wedding and I really hope it turns out as cute as I think it will. Can't wait to share.) While there Becca & I picked up random items to keep Ms. Bean occupied. On of them was a little wooden cat mask for Halloween. Ms. Bean is ALL about the cats, so she hung onto it pretty tight and didn't want to give it up. Consequently it came home with us. Since it's a distract Bean object, I suppose I could have left it alone. BUT I didn't so 30 minutes later I had this..

It looks better now that the glue is dry.
I'm still trying to get the hand of embrodery, but all in all I think it turned out cute. I don't have much in the way of tutorial, since I pretty much just winged the whole thing. I used left over felt, some embroidery thread, ribbon from the stash and a left over sparkly pipe cleaner. I embroidered the face, mod-podged everything to the mask, folded and hot glued the eye holes and ribbon and then I was done.

Ms. Bean seemed to appreciate it, at least until that flippin' Dream Lights commercial came on.

Distracted by the lullaby of commerce
Anyway, same rules apply to Bonus Adventures that apply to Craft Adventure Ventures. This project took a little over 30 minutes (I'm really slow at embroidery), so it's worth 1/2 of a Bonus Adventure.

It's been a rough and busy week. I truly hope to be finished with the Frankenscarf, but I've now said that 2 weeks in a row, so I'm playing it by ear. Despite everything I did create time to craft, even if it was only an hour, it's still something. I have a few Bean projects that need to be finished and I absolutely must complete the Wedding Bonus Adventure next week. Another busy week ahead. But I should have some nice items to share for next week.

This weeks tally is:

1/2 Craft Adventure Venture bringing me to 4.5 completed, 47.5 to go. Plus! .5 Bonus Adventures.

I should come up with an inspirational or funny phrase to end my blog. If you have any suggestions, comment below. If nothing else we'll all have a good giggle.